
A hanging indent, a formatting style frequently used in academic writing and when citing sources, is a unique typographical feature where every line of a paragraph after the first is indented. This indentation style allows for a clear visual separation of entries and sections, making it easier to scan and read through a list of references or any other compilation of text. Understanding and applying hanging indents appropriately is essential to maintain academic integrity. This article outlines how to format hanging indents in Microsoft Word and Google Docs.
Definition: Hanging indent
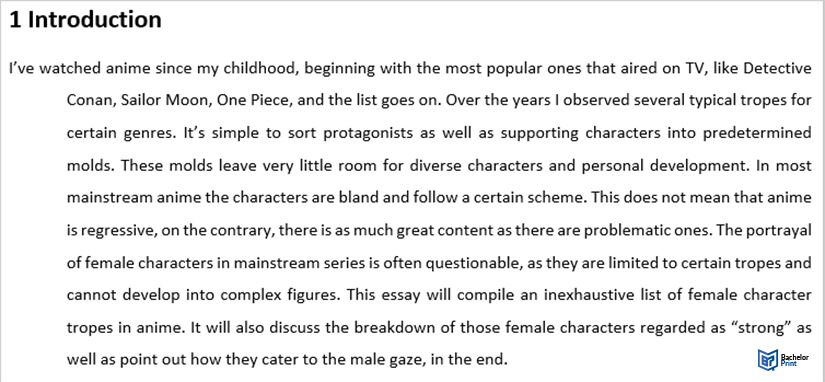
A hanging indent is a type of paragraph formatting in which every line, except the first one, is indented. This creates a ‘reverse’ indentation effect, with the first line starting at the margin and subsequent lines usually indented by a set amount, such as half an inch or a few spaces. Hanging indents are commonly used in bibliographies, reference lists, and Works Cited pages in academic papers, as they help to clearly delineate individual entries for easy readability. The format may vary depending on what style guide is followed in the paper, such as APA style, MLA, or Chicago style.
in Your Thesis
Hanging indent: Guide for Microsoft Word
There are several methods to create a hanging indent in Microsoft Word. We will show you two of those in the following text.
Creating a hanging indent in Word: Method 1
You can use the paragraph setting in Word to create a hanging indent.
Note: If you have more than one citation entry, press the enter key after selecting each reference. That way, you ensure that the first line of every single entry begins at the left margin.
This is how you do it:
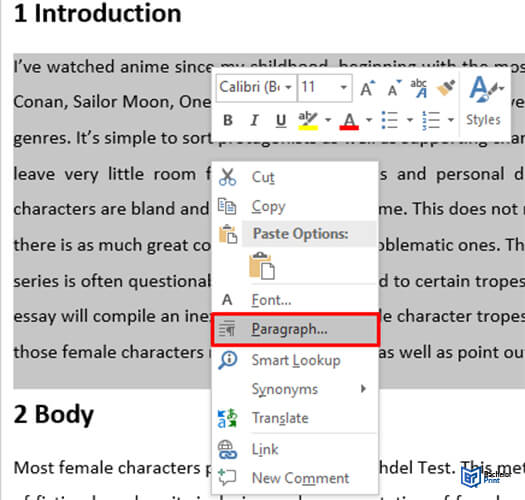
- Highlight the text you want to indent.
- Right-click the highlighted text.
- Select “Paragraph”.
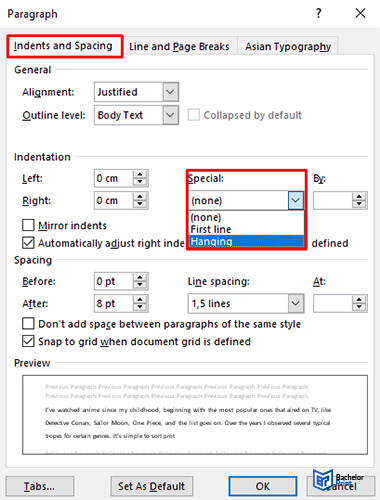
- Under “Indention”, open “Special”.
- In the “Special” drop-down menu, select “Hanging”.
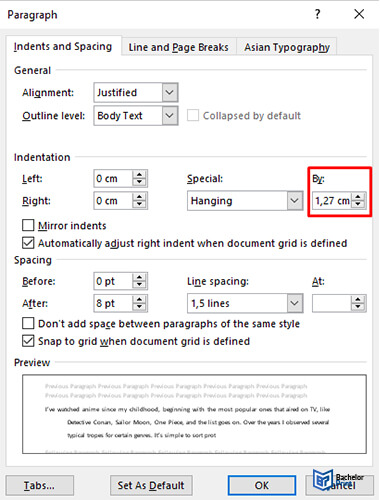
- To set the depth of the indent, use the “By” feature.
- At last, click “OK”.
The standard depth is 0.5 inches/1.27 cm.
Creating a hanging indent in Word: Method 2
It is also possible to create a hanging indent with the help of the ruler in Word. To set the ruler, click the “View” tab in the menu ribbon at the top and click the “Ruler” option box.
Simply follow these steps:
- Highlight the text you want to indent.
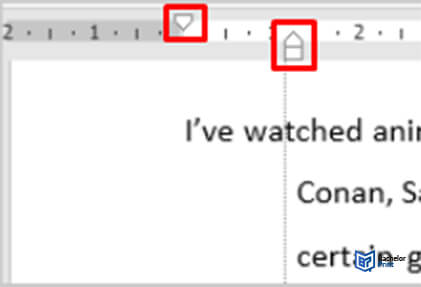
- With the help of the ruler, drag the “First Line Indent” marker (upper triangle marker) to where the first line of the paragraph should start
- With the help of the ruler, drag the “Left Indent” marker (lower triangle marker) to where the second and following lines of the paragraph should start.
Note: If you have more than one citation entry, press the enter key after selecting each reference. That way, you ensure that the first line of every single entry begins at the left margin.
Hanging indent: Guide for Google Docs
Besides Microsoft Word, Google Docs is often used for writing academic papers. However, you don’t have to use the “Enter” and “Tab” keys to indent each line manually because there is a special indention feature in Google Docs that helps you.
Follow these steps:
Note: If you have more than one citation entry, press the enter key after selecting each reference. That way, you ensure that the first line of every single entry begins at the left margin.
- Highlight the text you want to indent.
- Click “Format” in the menu ribbon at the top.
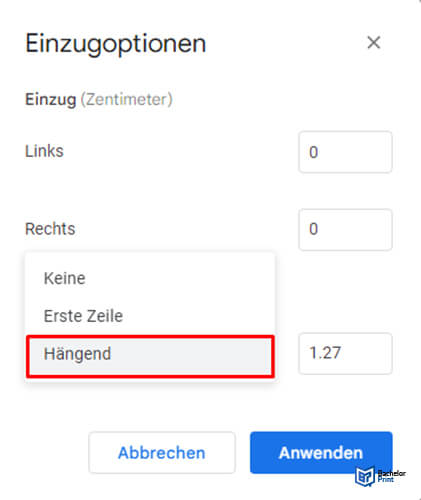
- Click “Align & Indent”, then select “Indention options”.
- Open “Special indent” and select “Hanging” in the drop-down menu. Now you can set the depth of the indent you need.
- Click “Apply”.
Example: Hanging indent in Word
A hanging indent in reference lists
A hanging indent separates the individual reference entries, which makes it easier for the reader to look for a certain author or title.
Hanging indents are used and required in many different citation style guides. These include:
- APA reference pages
- Chicago style bibliographies
- MLA Works Cited
In all three citation styles, the standard depth of the indent is 0.5 inches/1.27 cm.
| APA reference entries | Surname, Initial. (Year). Title. Publisher. |
| Chicago style bibliography entries | Surname, First Name. Title. Location: Publisher, Year. |
| MLA Works Cited entries | Surname, First Name. Title. Publisher, Year. |
It is used in reference lists of various citation style guides and separates the individual entries. This makes it easier for the reader to look for a specific source.
It indents all lines of a paragraph except for the first one.
If you are using APA, MLA, or Chicago style, hanging indents in the reference lists are required. The standard depth of the indent is 0.5 inches/1.27 cm for every citation style.
