Creating an ideal study timetable can be a game-changer for students aiming to maximise their productivity and achieve their academic goals. By organising your study schedule, you can ensure that you devote adequate time to each subject, reduce stress, and stay on track. In this article, we will explore essential tips for designing a study timetable that works for you. Whether you’re preparing for exams or managing daily coursework, these tips will guide you in creating an efficient study plan.
Definition: Study timetable
A study timetable is a structured revision plan that allocates specific time slots for different study activities over a set period, such as a week or a month. It helps students organise their study sessions, manage their revision time efficiently, and ensure that all subjects and tasks are given adequate attention. By outlining what to study and when, a well-organised study timetable aids in balancing academic workload with personal commitments, which in turn reduces stress and improves productivity. It serves as a roadmap to achieve academic goals, similar to SMART Goals.
Prospective or retrospective timetable
Two of the main study techniques are prospective and retrospective study timetables. Both concepts will be explained below, along with example study timetables and why one is more productive than the other one.
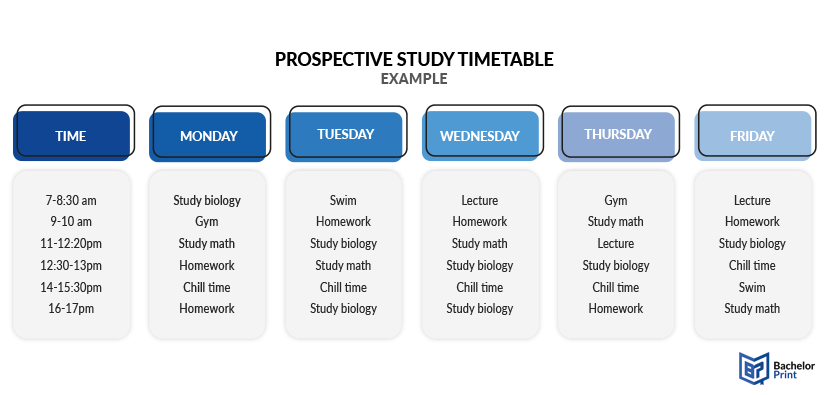
A prospective study timetable is a forward-looking schedule that plans future activities and tasks. It outlines what needs to be done in the upcoming days before the exam date, helping individuals organise their time and priorities in advance.
Functions
- Identify upcoming tasks and activities
- Allocate specific time slots for each task
- Follow the planned schedule, making necessary adjustments
- Periodically review the timetable to ensure it remains relevant
Below, you’ll find an example image of a prospective study timetable.

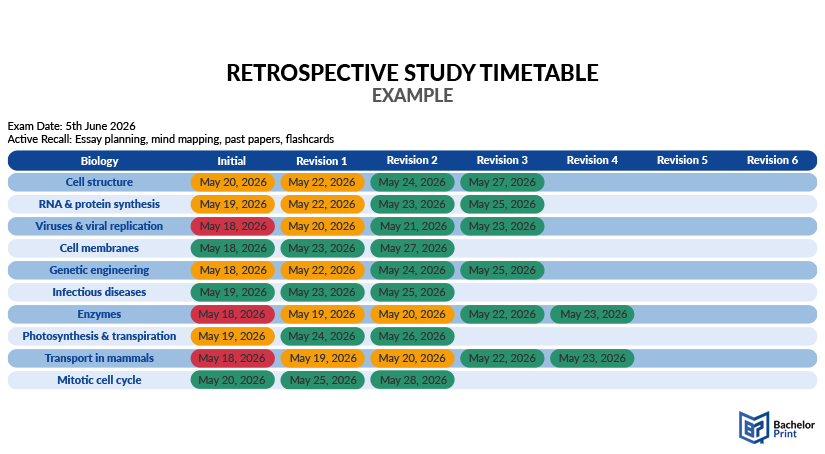
A retrospective timetable is a backward-looking schedule that reviews and records past activities and tasks. It helps individuals reflect on how they have spent their time and evaluate their productivity and effectiveness before the exam.
Functions
- Document completed tasks, activities, and their duration
- Regularly review the recorded information to assess effectiveness
- Identify successes and areas needing improvement
- Use insights gained from the analysis to adjust future timetables
Below, you’ll find an example image of a retroprospective study timetable.

From this comparison, we can deduct that while the prospective study timetable is more commonly used, it is pretty unrealistic and not quite as helpful as one would like. A forward-looking schedule can sometimes result in repeating subjects that are not one’s weak points. Additionally, unexpected events can interrupt the entire schedule, leading to revision of the timetable, and thus a huge waste of time, while a retrospective study timetable is more straightforward.
Instead of thinking “I need to revise three different topics in three hours,” it is usually more helpful to think “what topics do I need to improve?”. A prospective study timetable might lead to a lack of motivation and an increased cycle of procrastination due to being “forced to” accomplish several topics or subjects a day. A retrospective one clearly shows you which topics you need to improve for a specific subject.
According to Parkinson’s Law, “work expands to fill the time available for its completion,” suggesting that if you allocate a certain amount of time to complete a task, the task will often take up more time than necessary. This law can lead to procrastination, leaving tasks until right before they are due since one might feel relieved that there is plenty of time before a deadline.
Making an effective study timetable
Now that we know what a great study planner should look like, it is time to create one. Here is a step-by-step guide that will help you create a practical timetable for studying.

Step 1: Review your current schedule
Before you create your retrospective timetable, you need to assess how you currently spend your time. Do you have weekly extracurriculars, work, hobbies, or other unchanging commitments and at which times and dates are your classes? Also, don’t omit significant holidays and birthdays when reviewing your schedule. Figuring out when you have spare time to study is essential when creating your study timetable to prevent overworking yourself.

Step 2: Analyze your study habits
Do you know at what times you are the most productive? Are you a night owl or an early bird? People that wake up early might be more productive in the morning since that’s when they’re the most energized, while night owls might prefer studying before bed. After breakfast or dinner, do you need some time to wind down or are you ready to start studying immediately? When you discover your peak study hours, you can create an optimal schedule for yourself.

Step 3: List all topics you’re unfamiliar with
Instead of writing down your whole week’s schedule and focusing on unimportant details, you should write down all topics for that subject (or multiple subjects) that you don’t have a good grasp of. We often gravitate towards subjects we find comfortable because we understand the basic principles, making them seem easier. However, for an effective revision, it is essential to remind yourself to focus on the topics you are least comfortable with.

Step 4: Create your timetable grid
For your well-planned study timetable, you can use spreadsheet programs, such as Microsoft Excel, word processors like Microsoft Word, specialized apps for study timetables, or use templates (which we will also provide below). You can use a digital timetable, a paper timetable or even combine both by printing out your template. Add the subject in the top-left corner of your timetable and type or write in all the topics you listed earlier underneath the subject. Add your initial understanding of the topics in the second column by highlighting the revision date using green, yellow, or red depending on high, medium, or low comprehension of each topic. Of course, you can choose whichever colors you like, but these three colors give a quick visual report of your understanding.

Step 5: Using your study timetable
Generally, it is advised to avoid starting with topics you feel comfortable with, meaning that you should start with the red marked topics first, since they will take more time to cover. Depending on your peak study hours, each morning or evening, skim through your timetable and pick the difficult topics or the ones you haven’t covered in the last few days. How to properly study will be explained in the next paragraph. Your end goal is to get every topic to green before the day of your exam. Don’t forget to schedule in time for breaks when needed. If you are not in the right headspace for studying, slowly get into study mode by doing some light homework. You can gain maximum productivity and focus by employing the pomodoro technique, which we will talk about in the next paragraph as well.
How to study effectively
To successfully use your well-developed study timetable, it is vital to revise your topics properly – and no, reading your notes does not count. This specific revision exercise, watching a lecture on the topic, or copying out of a textbook are all passive recall revisions and unfortunately are not very effective. Instead, use active recall revision, which includes…
- Teaching someone else the topic (or a study partner)
- Using flashcards on the topic
- Mind mapping the connections between topics
- Writing an essay or essay plan
- Completing a past paper
- Solving a problem sheet
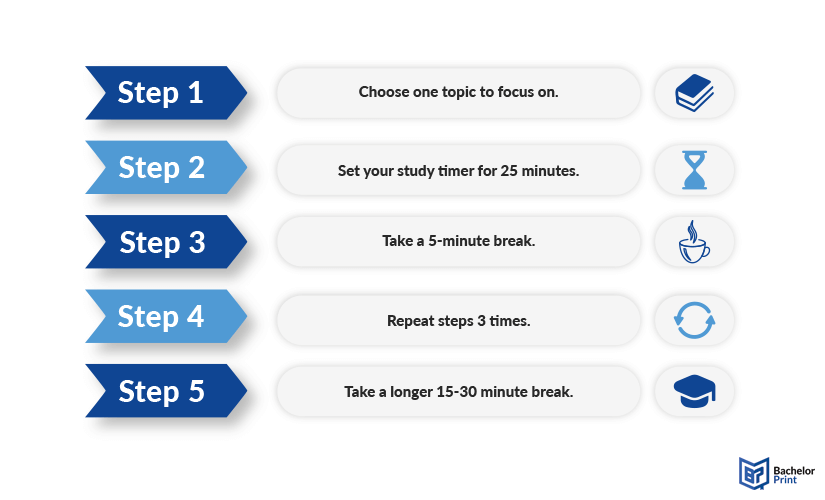
This process shifts you from merely recognising the answer to truly understanding it by recalling and applying facts and information. Earlier, we have mentioned the pomodoro technique, which is an ADHD-friendly method that provides a clear measurement of time and rewards you for your hard work. This method was first developed by the college student Francesco Cirillo in the late 1980s who noticed through trial and error that 25 minutes were optimal for maintaining concentration and achieving study success. According to his study tips, five-minute regular breaks were enough to help you regain energy and mental clarity.
Below are the necessary steps involved in the use of the pomodoro technique.

This study technique is very simple and adaptable, and you can even adjust it. If you think 25 minutes of study is not enough time, change it to 40–50 minutes with 15-minute breaks between study sessions.
Now that you know how to study properly, it is important to be mindful of your study environment. It should be free of clutter and include limited distractions. Factors such as sound and smell can also impact your study environment. The breaks are intended to be relaxing and restorative, so spending them on writing messages, listening to music, or scrolling through social media is not giving your brain the needed rest. Here are some study tips about what you can do during your break:
- Go on a quick walk
- Do some stretching
- Let some fresh air in
- Get food ready for your big break
- Grab a snack
- Rest your eyes
- Do some yoga
- Bathroom break
- Challenge yourself to do some chores in the short break
Study timetable templates
Below we have created several study timetable templates that you can either download or use as inspirations for your own study timetable.
Pros and cons of a study timetable
While a study timetable can be very beneficial, there are some problems that might arise. Below, you’ll find a list of benefits and difficulties that may come with this study method.
Benefits
Numerous benefits of a study timetable are listed below.
- Targeted improvement: It focuses on areas where improvement is most needed, which helps address weaknesses directly and improves the overall performance in a subject.
- Progress visualization: Color-coding provides a visual representation of progress by changing a topic from red (difficult) to yellow (moderate) and eventually to green (easy).
- Efficient use of time: This specific timetable ensures that study is spent on the most challenging areas rather than easier ones, potentially leading to more significant improvement.
- Customized learning: It allows for a personalized approach to study by addressing individual difficulties and enhancing metacognition by encouraging students to reflect on their own learning process.
- Motivation and encouragement: Seeing progress through color changes can boost motivation and encourage continued effort, or it can increase motivation by wanting to thoroughly understand a topic.
Problems
Some concerns that come with a study timetable can be found below.
- Neglect of easier topics: May lead to neglection of easy topics, which still require some level of review to maintain proficiency. However, this can be easily balanced out by revision of easy topics at the end of a study session.
- Potential overwhelm: Constantly focusing on difficult topics might become overwhelming and discouraging to some students over time.
- Lack of variety: Focusing solely on difficult topics may reduce variety in study sessions, leading to monotony. This can be balanced out by using retrospective study timetables for multiple subjects.
FAQs
A retrospective study timetable is ideal for studying as it focuses on problem areas instead of an hourly study schedule.
You can make a study timetable by following the following points:
- Figure out your study habits: are you a night owl or early bird?
- List all topics on a subject you have problems with
- Color-code the study dates based on whether the topics are difficult, okay, or easy for you
- Revise the difficult topics first and improve a red to a green
The most effective study schedule is one that focuses on your level of understanding a topic instead of a strict plan on when to study which topic. You can find out more about this technique and how to reach a high level of productivity in our article.
The ideal daily study time should be around 3 hours of revision and 5-minute breaks in between, depending on the day and schedule.
